# 前言
集合类是 Java 中非常重要也是最常用的一块,它其实和数学中的定义差不多,是为了更好的管理和操作数据而存在的,前面一部分会先记录一下数据结构的部分,比较偏理解的东西,如果学习过可以跳过这部分,本篇中所有代码都在 Clown_java/src/main/java/JavaSE at master・clown-q/Clown_java (github.com)
# 数据结构
# 顺序表
顺序表存储数据的单元还是数组,不过其数据排列紧凑,物理和逻辑上都是连续的,因为我之前学的数据结构是 c 语言版(当然也学的并不好,不然我也不会在这里记录这样的一篇,感谢老师的不杀之恩),这里可能会贴一些 java 的代码
public class SequenceTable<T> { | |
int size = 0; // 顺序表中当前元素数量 | |
int max = 10; // 顺序表能存放的最大元素数量 | |
Object[] arr = new Object[max]; // 实际存放元素的数组 | |
} |
这里定义了一个类,使用泛型可以使得存放的数据更加灵活
# add
public void add(T t,int index){ //T 是要插入的数据,index 是要插入的位置 | |
if(index<0||index>size){ // 这里判断传入的位置是否合法 | |
throw new IndexOutOfBoundsException("插入位置不合法,插入的位置只能是0 - "+size); | |
}else if(size+1>max){// 判断表是否已满 | |
throw new IndexOutOfBoundsException("最多只能存放"+max+"个数据,请尝试删除数据后再插入"); | |
}else { | |
for (int i =size;i>index;i--){ | |
arr[i] = arr[i-1]; | |
} | |
arr[index]=t; | |
size++; | |
} | |
} |
这里对于顺序表中的数据满了的策略是抛出异常,当然这里也可以扩充顺序表,也不用手动的回收,这点显然比 C 实现要更加灵活
public void add(T t,int index){ //T 是要插入的数据,index 是要插入的位置 | |
if(index<0||index>size){ | |
throw new IndexOutOfBoundsException("插入位置不合法,插入的位置只能是0 - "+size); | |
}else if(size+1>max){ | |
max = max + (max >> 1); | |
Object[] arr2 = new Object[max]; | |
System.arraycopy(arr,0,arr2,0,size); | |
arr = arr2; | |
}else { | |
for (int i =size;i>index;i--){ | |
arr[i] = arr[i-1]; | |
} | |
arr[index]=t; | |
size++; | |
} | |
} |
简单的测试一下
public class DataTest { | |
public static void main(String[] args) { | |
SequenceTable<String> sequenceTable =new SequenceTable(); | |
for (int i = 0; i<15; i++) { | |
sequenceTable.add("aa", 0); | |
} | |
System.out.println(sequenceTable); | |
} | |
} |

# remove
接下来简单写一下删除
public void remove(int index){// 返回删除的元素 | |
if(index<0||index>size-1){ | |
throw new IndexOutOfBoundsException("删除的索引不合法,范围应该为0 - "+(size-1)); | |
}else { | |
for(int i=index;i<size;i++){ | |
arr[i]=arr[i+1]; | |
} | |
size--; | |
} | |
} |
这里也测试一下
public class DataTest { | |
public static void main(String[] args) { | |
SequenceTable<Integer> sequenceTable =new SequenceTable(); | |
for (int i = 0; i<15; i++) { | |
sequenceTable.add(i, 0); | |
} | |
System.out.println(sequenceTable); | |
sequenceTable.remove(4); | |
System.out.println(sequenceTable); | |
} | |
} |

# getIndex
然后是取指定位置的元素,这个就比较简单,直接检查一下索引,合法就输出就行
public void getIndex(int index){ | |
if(index<0||index>size-1){ | |
throw new IndexOutOfBoundsException("索引不合法,范围应该为0 - "+(size-1)); | |
}else { | |
System.out.println(arr[index]); | |
} | |
} |
简单的验证一下
public class DataTest { | |
public static void main(String[] args) { | |
SequenceTable<Integer> sequenceTable =new SequenceTable(); | |
for (int i = 0; i<15; i++) { | |
sequenceTable.add(i, 0); | |
} | |
System.out.println(sequenceTable); | |
sequenceTable.remove(4); | |
System.out.println(sequenceTable); | |
sequenceTable.getIndex(3); | |
} | |
} |

还有一些别的功能,比较简单,这里就不在写了
# 链表
上面的顺序表实际上还是数组,而链表不在使用数组,通过 “指针” 来连接各个结点,物理上不相邻,逻辑上是相邻的,又分为两种,带头结点和不带头结点的两种结构
带有头结点的结构,头结点中不存放数据
常用的是带头结点的链表

public class LinkedList<T> { | |
class Node<T>{// 结点 | |
private T data; // 结点存放的数据 | |
private Node<T> next; // 指向下一个结点 | |
public Node(T data) { | |
this.data = data; | |
} | |
} | |
private Node<T> headNode = new Node<>(null);// 头结点设置为空 | |
private int size=0; | |
} |
这样就定义好了一个链表,存放数据的是内部类 Node 中的 data 成员属性,使用 next 做一个链接
# add
链表的插入和顺序表是不同的效率较高
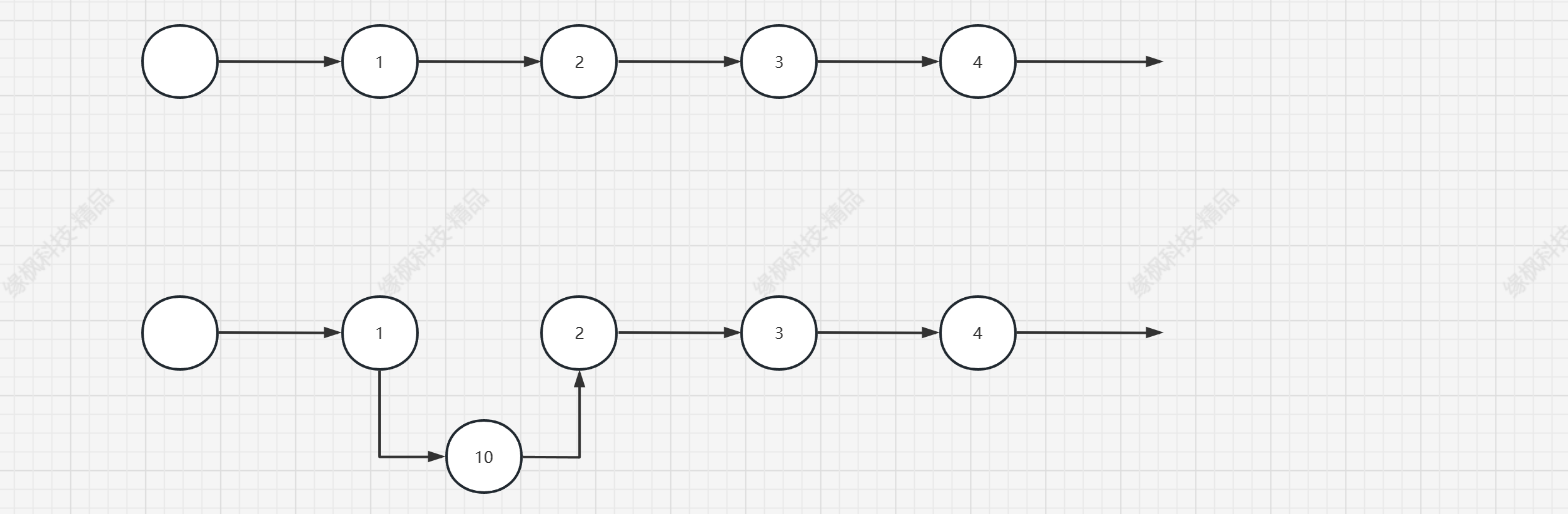
像上图中,想要将 10 插入到 1 和 2 之间,首先将 1,2 之间的连接断开,1 指向 10,10 指向 1 就完成了插入,接下来看看代码是怎么实现的
public void add(T t,int index){ | |
if(index<0||index>size){ | |
throw new IndexOutOfBoundsException("插入位置不合法,插入的位置只能是0 - "+size); | |
}else { | |
Node<T> head = headNode; // 使用头结点 | |
for (int i = 0;i<index;i++){ | |
head = head.next; // 遍历到要插入的位置 | |
} | |
Node<T> node = new Node<>(t); // 创建一个新的结点 | |
node.next = head.next; // 新结点指向当前结点指向的结点 | |
head.next = node; // 前一个结点指向当前结点 | |
size++; | |
} | |
} |
这里重写本类和内部类的 toString 方法
public class LinkedList<T> { | |
class Node<T>{// 结点 | |
private T data; // 结点存放的数据 | |
private Node<T> next; // 指向下一个结点 | |
public Node(T data) { | |
this.data = data; | |
} | |
@Override | |
public String toString() { | |
return "Node{" + | |
"data=" + data + | |
", next=" + next + | |
'}'; | |
} | |
} | |
private Node<T> headNode = new Node<>(null);// 头结点设置为空 | |
private int size=0; | |
public void add(T t,int index){ | |
if(index<0||index>size){ | |
throw new IndexOutOfBoundsException("插入位置不合法,插入的位置只能是0 - "+size); | |
}else { | |
Node<T> head = headNode; // 使用头结点 | |
for (int i = 0;i<index;i++){ | |
head = head.next; // 遍历到要插入的位置 | |
} | |
Node<T> node = new Node<>(t); // 创建一个新的结点 | |
node.next = head.next; // 新结点指向当前结点指向的结点 | |
head.next = node; // 前一个结点指向当前结点 | |
size++; | |
} | |
} | |
@Override | |
public String toString() { | |
return "LinkedList{" + | |
"headNode=" + headNode + | |
", size=" + size + | |
'}'; | |
} | |
} |
写一个测试方法
public static void main(String[] args) { | |
LinkedList<Integer> linkedList = new LinkedList<>(); | |
linkedList.add(1,0); | |
linkedList.add(1,0); | |
System.out.println(linkedList); | |
} |

可以看见,这里添加方法就写好了
# remove
接下来就是删除方法

还是这样一个链,比如说想删除 2,现将 1 直接指向 3 就可以了
public void remove(int index){ | |
if(index<0||index>size-1){ | |
throw new IndexOutOfBoundsException("删除的索引不合法,范围应该为0 - "+(size-1)); | |
}else { | |
Node<T> head = headNode; | |
for(int i=0;i<index;i++){ | |
head=head.next; | |
} | |
head.next=head.next.next; | |
size--; | |
} | |
} |
这个就比较简单,测试类中这样写
public static void main(String[] args) { | |
LinkedList<Integer> linkedList = new LinkedList<>(); | |
for (int i = 0; i<3; i++) { | |
linkedList.add(i, 0); | |
} | |
System.out.println(linkedList); | |
linkedList.remove(1); | |
System.out.println(linkedList); | |
} |

这里有回收机制,不用管空出来的结点 2
# getindex
获取对应位置上的数据
public void getIndex(int index){ | |
Node<T> head = headNode; | |
for(int i=0;i<index;i++){ | |
head = head.next; | |
} | |
System.out.println(head.data); | |
} |
遍历到,然后直接获取即可,测试方法
public static void main(String[] args) {// 链表 | |
LinkedList<Integer> linkedList = new LinkedList<>(); | |
for (int i = 0; i<5; i++) { | |
linkedList.add(i, 0); | |
} | |
System.out.println(linkedList); | |
linkedList.remove(1); | |
System.out.println(linkedList); | |
linkedList.getIndex(3); | |
} |

顺序表支持随机访问,读取数据的速度较块,但是插入删除时效率低,而链表刚好相反,所以根据需求选择合适的数据结构更好
# 栈
一种特殊的顺序表,只能在表尾操作,不能直接操作前面的参数,先进后出的一种数据结构,可以基于之前的顺序表和链表,不过有两种写的功能
- pop,出栈,从栈顶取一个元素
- push,入栈,从栈顶加入一个元素
或许你会注意到这里有一个新的词,栈顶,前面说我们只能在表尾部操作,尾部这一端通常我们称为栈顶,另一端称为栈底
简单来说,就是有限制的线性表,这里选用链表来实现一下
public class Stack_Linked<T> { | |
class Node<T>{ | |
T data; | |
Node<T> next; | |
public Node(T data) { | |
this.data = data; | |
} | |
@Override | |
public String toString() { | |
return "Node{" + | |
"data=" + data + | |
", next=" + next + | |
'}'; | |
} | |
} | |
private Node<T> nodeHead = new Node<>(null); | |
private int size = 0; | |
public void push(T t){ | |
Node<T> node = new Node<>(t);// 创建一个新结点 | |
node.next = nodeHead.next; // 新结点指向头结点指向的结点 | |
nodeHead.next=node; // 头结点指向新结点 | |
size++; | |
} | |
public T pop(){ | |
if (nodeHead.next==null){ // 判断栈空 | |
throw new NoSuchElementException("栈是空的"); | |
} | |
T t = nodeHead.next.data; // 保存数据 | |
nodeHead.next = nodeHead.next.next; // 头结点指向下一个结点的下一个结点 | |
size--; | |
return t; | |
} | |
@Override | |
public String toString() { | |
return "Stack_Linked{" + | |
"nodeHead=" + nodeHead + | |
", size=" + size + | |
'}'; | |
} | |
} |
这样就实现了一个简单的栈,写一个测试方法
public static void main(String[] args) {// 栈 | |
Stack_Linked<Integer> stackLinked = new Stack_Linked<>(); | |
stackLinked.push(10); | |
stackLinked.push(10); | |
stackLinked.push(10); | |
System.out.println(stackLinked); | |
stackLinked.pop(); | |
System.out.println(stackLinked); | |
} |

# 队列
前面记录了栈,它是一种特殊的线性表,有着先进后出的性质,其实是一种有限制的线性表,而队列也差不多,它就和他的名字队列一样,队头的先操作,不能插队
元素只能在队尾插入,只能从队首出队,先进先出
队列也是可以使用链表和顺序表两种来实现,这里还是使用链表

大概是上图这种结构
public class Queue_Listed<T> { | |
private class Node<T>{ | |
T data; | |
Node<T> next; | |
public Node(T data) { | |
this.data = data; | |
} | |
@Override | |
public String toString() { | |
return "Node{" + | |
"data=" + data + | |
", next=" + next + | |
'}'; | |
} | |
} | |
private Node<T> nodeHead = new Node<>(null);// 头结点,指向队首 | |
private int size = 0; | |
@Override | |
public String toString() { | |
return "Queue_Listed{" + | |
"nodeHead=" + nodeHead + | |
", size=" + size + | |
'}'; | |
} | |
} |
这里和链表的结构相同,多定义了一个尾结点
# add
public void add(T t){ | |
Node<T> head = nodeHead; | |
for (int i=0;i<size;i++){ // 找到尾结点 | |
head = head.next; | |
} | |
Node<T> node = new Node<>(t); // 创建新结点 | |
head.next = node; | |
size++; | |
} |
写一个测试方法
public static void main(String[] args) { | |
Queue_Listed<Integer> queueListed =new Queue_Listed<>(); | |
queueListed.add(10); | |
queueListed.add(10); | |
queueListed.add(10); | |
System.out.println(queueListed); | |
} |

# remove
public T remove(){ | |
T t = nodeHead.next.data; | |
if (nodeHead.next==null){ | |
throw new NoSuchElementException("队列为空"); | |
} | |
nodeHead.next = nodeHead.next.next; | |
size--; | |
return t; | |
} |
这里将队首的指向的数据返回,首接结点指向下一个结点的下一个结点,写一个测试方法
public static void main(String[] args) { | |
Queue_Listed<Integer> queueListed =new Queue_Listed<>(); | |
queueListed.add(10); | |
queueListed.add(10); | |
queueListed.add(10); | |
System.out.println(queueListed); | |
System.out.println(queueListed.remove()); | |
System.out.println(queueListed); | |
} |

# 二叉树
前面都是线性表的的数据结构,下面开始树型结构的记录,树型结构名副其实,它和树一样,从一个点有多个分结点,各个分节点不相交
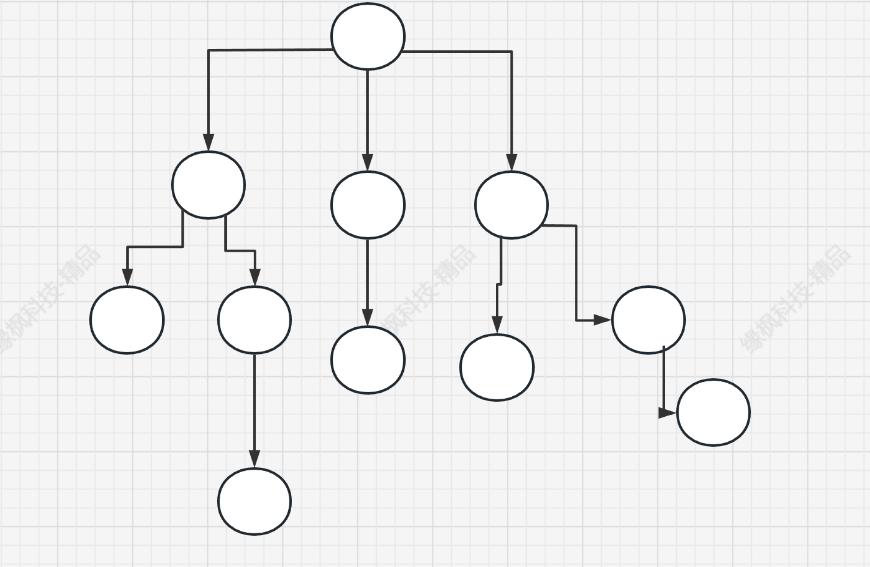
类似于这种结构,这里简单的记录一下树的相关概念:
- 根节点,上图中最上方这个节点称为根节点,就和树根一样
- 度,一个结点其子结点的个数
- 树的深度,整个树的最大层数
- 一个结点下面的直接相连的结点被称为子结点
- 没有子结点的结点被称为叶子结点
- 同一个结点的子结点之间互相为兄弟节点
而二叉树是度为 2 的树,接下来看代码实现
二叉树中的结点的子树是有左右之分的
public class BinaryTree<T> { | |
public T data; | |
public BinaryTree<T> left,right; | |
public BinaryTree(T data) { | |
this.data = data; | |
} | |
} |
因为二叉树的最大度是 2,所以这里有两个引用就可以了
这里建立一个如下图的二叉树
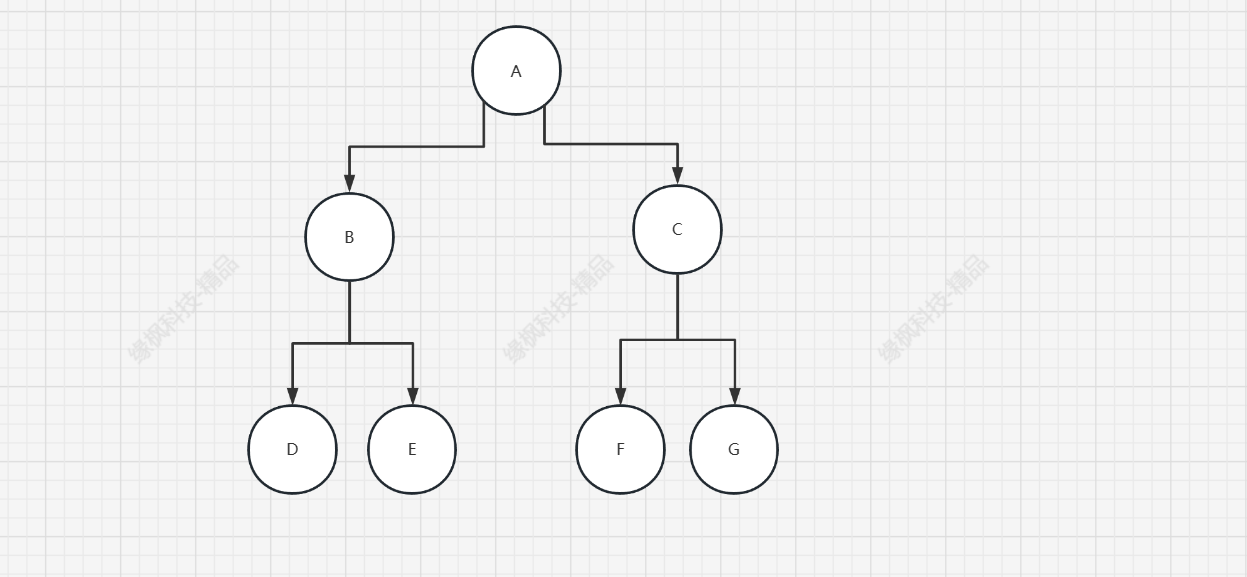
public static void main(String[] args) { | |
BinaryTree<Character> binaryTree1 = new BinaryTree<>('A'); | |
BinaryTree<Character> binaryTree2 = new BinaryTree<>('B'); | |
BinaryTree<Character> binaryTree3 = new BinaryTree<>('C'); | |
BinaryTree<Character> binaryTree4 = new BinaryTree<>('D'); | |
BinaryTree<Character> binaryTree5 = new BinaryTree<>('E'); | |
BinaryTree<Character> binaryTree6 = new BinaryTree<>('F'); | |
BinaryTree<Character> binaryTree7 = new BinaryTree<>('G'); | |
binaryTree1.left = binaryTree2; | |
binaryTree1.right = binaryTree3; | |
binaryTree2.left = binaryTree4; | |
binaryTree2.right = binaryTree5; | |
binaryTree3.left = binaryTree6; | |
binaryTree3.right = binaryTree7; | |
} |
# 集合类
也是正式开始集合类的学习,集合和数组差不多,表示一组对象,集合为了更加方便的管理数据,但是他们还是有很多不同之处
- 集合是可变的,而数组的大小在定义的时候就已经固定了
- 数组只能存放一种数据,而集合可以存放不同的数据类型
- 集合只能是引用类型,也就是说只能存放对象
# 集合根接口
其实这些集合类都是 jdk 已经实现好了的
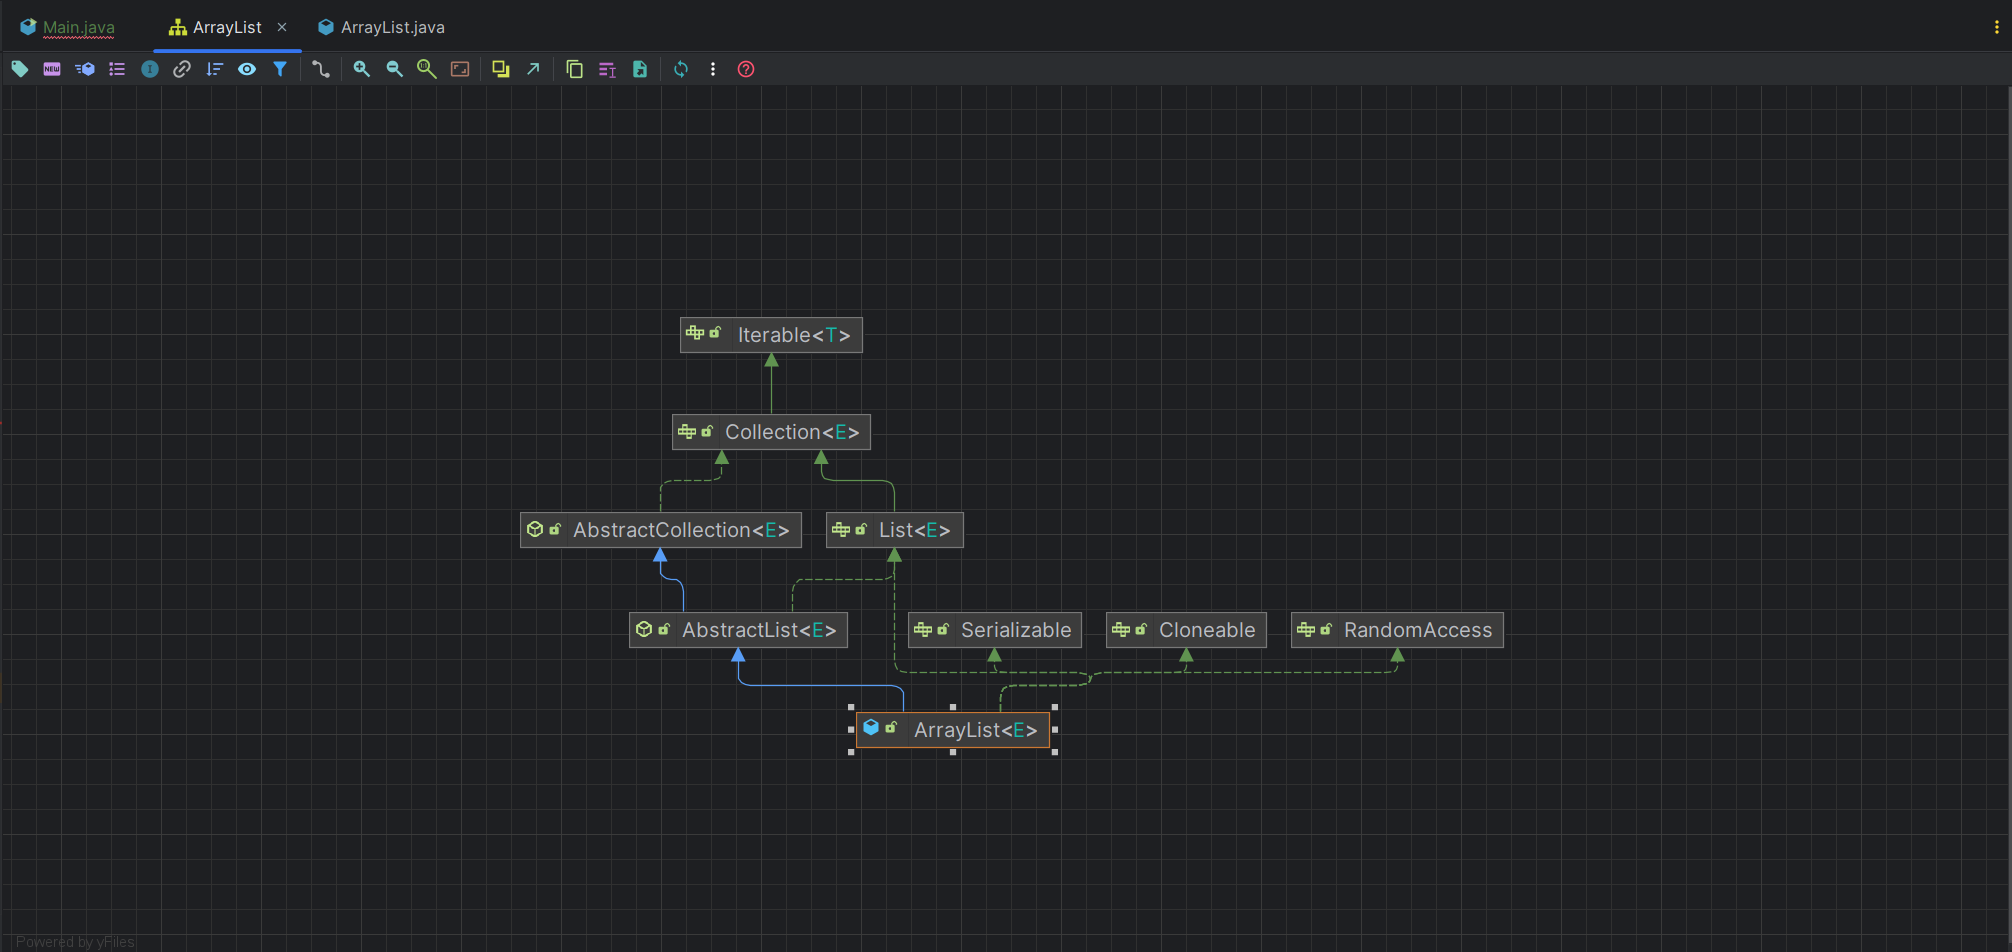
这里看一下 ArrayList 的继承关系,也可以去看源码

这里 Lterable 是迭代器,实际上的接口其实是 Collection,详细看一下这个接口
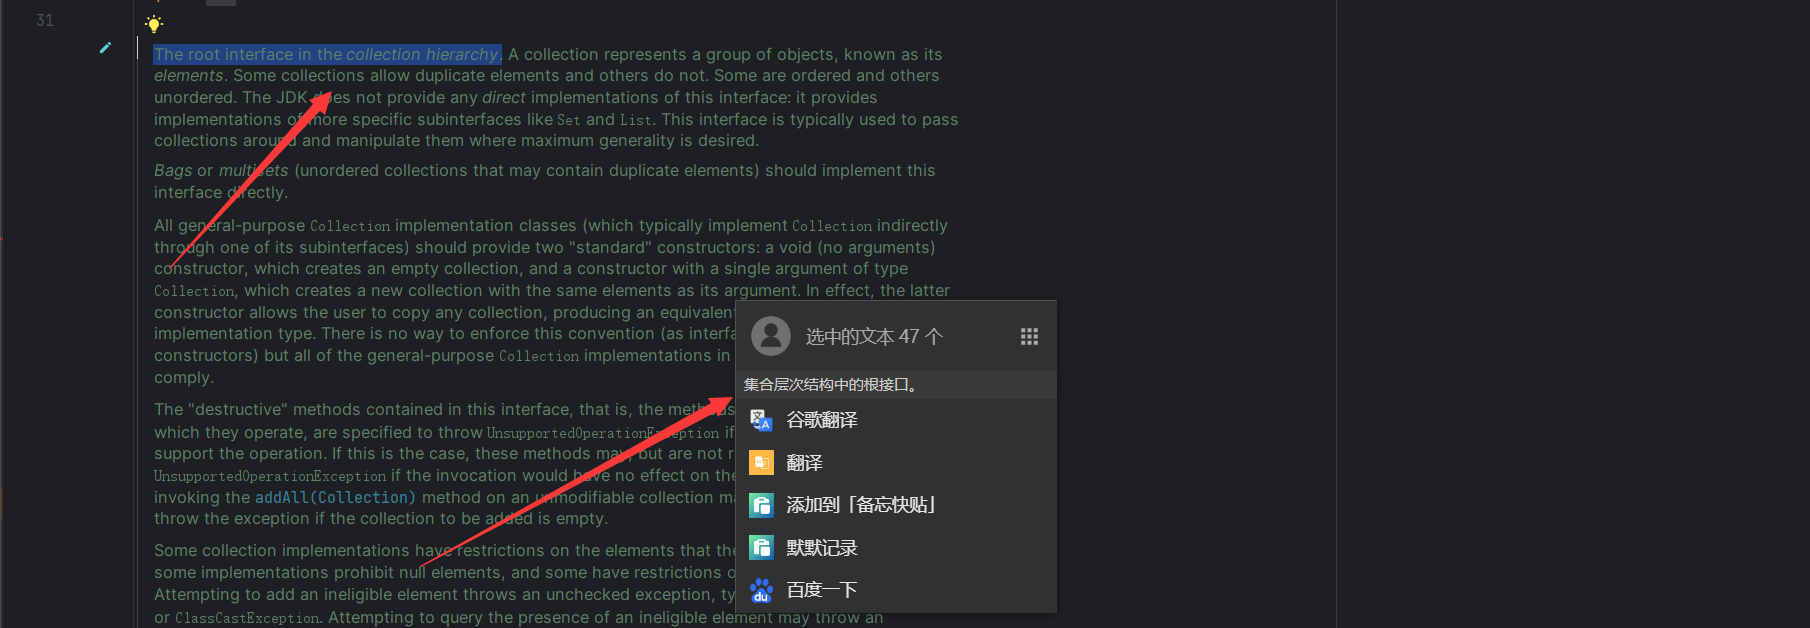
可以看到,它是集合层次结构中的根接口,这里简单看一下,都有哪些方法
int size(); // 集合中元素数量 | |
boolean isEmpty();// 判断集合是否为空 | |
boolean contains(Object o); // 判断集合是否包含某个元素 | |
Iterator<E> iterator(); // 生成当前集合的一个迭代器 | |
Object[] toArray(); // 转化为对应的数组,默认转化为 Object | |
<T> T[] toArray(T[] a); // 提供一个类型 | |
boolean add(E e); // 添加数据到集合 | |
boolean remove(Object o); // 从集合中删除元素 | |
boolean containsAll(Collection<?> c); // 判断是否包含子集 | |
boolean addAll(Collection<? extends E> c); // 添加集合中的所有元素 | |
boolean removeAll(Collection<?> c); // 删除给定集合中的所有元素 | |
default boolean removeIf(Predicate<? super E> filter); // 更具条件移除元素 | |
boolean retainAll(Collection<?> c); // 保留给定集合中的元素 | |
void clear(); // 清空集合 | |
boolean equals(Object o); // 判断两个集合是否相等 | |
int hashCode(); // 计算集合的 hash 值 |
实际上学习集合这块内容主要是看各个实现类是怎么做的,理解一下东西比较多,但是不难
# List 列表
list 其实就是前面写到的线性表,其实也是一个接口,存放数据的地方是一个可扩容的数组,他其实与顺序表差不多,元素通过下标访问,可以有重复的元素
集合中判断是否为重复的元素,使用的是 equals 方法来判断
public class Main { | |
public static void main(String[] args) { | |
ArrayList<Integer> arrayList = new ArrayList<>(); | |
arrayList.add(10); | |
System.out.println(arrayList.contains(10)); | |
} | |
} |
比如说,这段代码实例化一个集合后,向其中插入一个元素 10,然后通过 contains 判断

这里是返回 true 的,那么我再向集合中加入一个元素 10
public class Main { | |
public static void main(String[] args) { | |
ArrayList<Integer> arrayList = new ArrayList<>(); | |
arrayList.add(10); | |
System.out.println(arrayList.contains(10)); | |
arrayList.add(10); | |
System.out.println(arrayList); | |
} | |
} |

这里可以看到是可以的
可以看到其实这是使用的是 equals 判断的
# ArrayList
这里看一下 ArrayList 上的实现思路
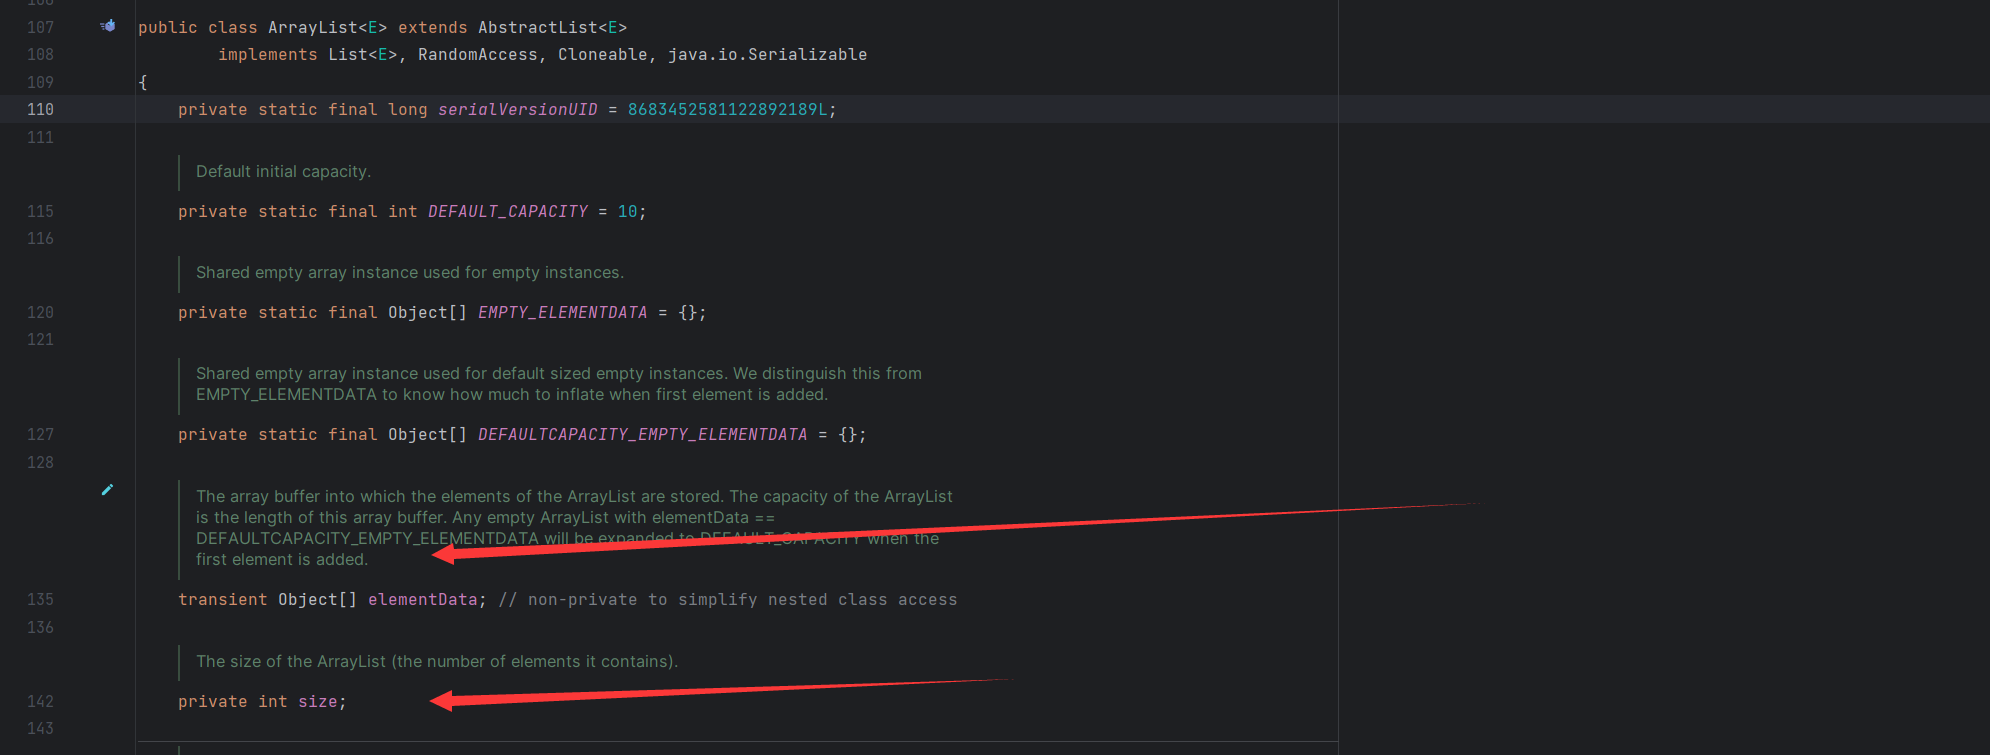
前面也说过它实际上是通过数组来存储数据,这里也可以证明,同样用了一个 size 存储大小

如果不带参数,回默认创建一个长度为零的数组

当然也可以自定义初始化长度

也可以直接通过一个集合去创建另一个集合
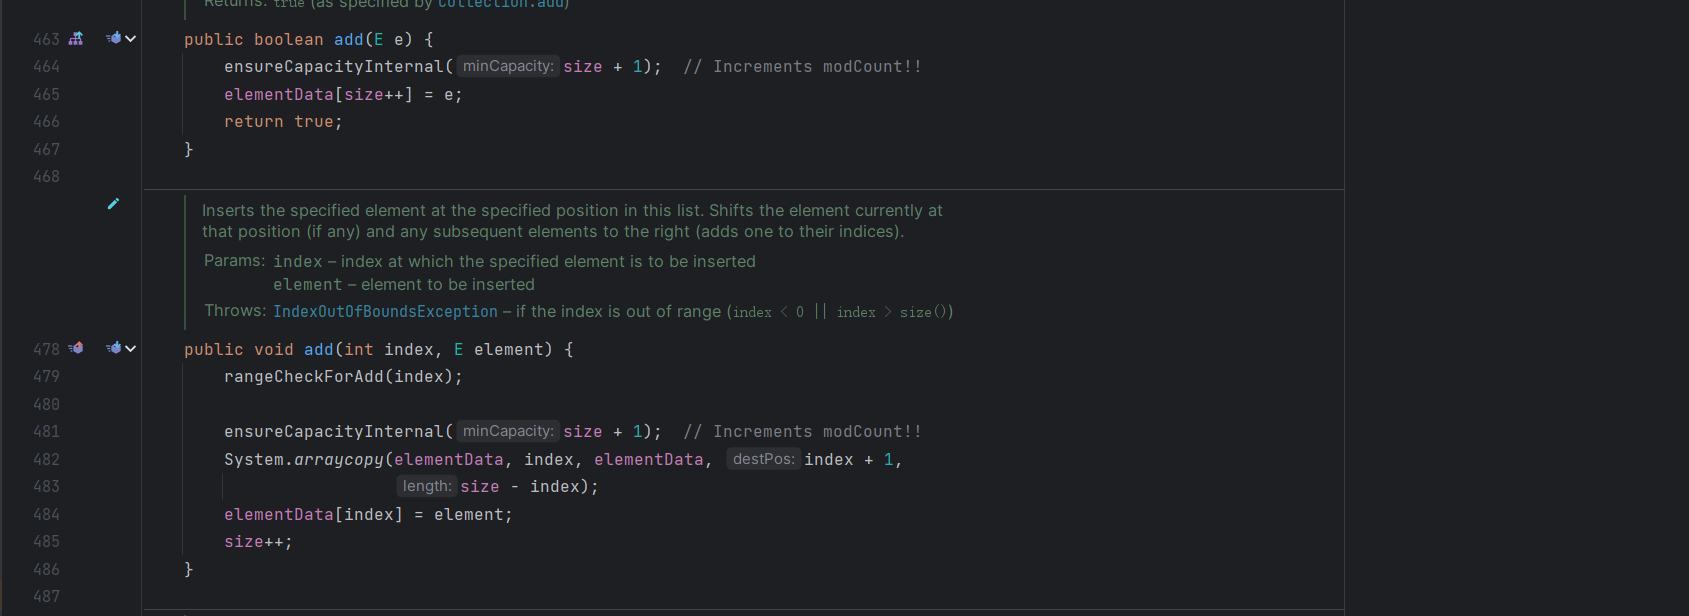
先看一下 add 的方法其实这里和我之前在数据结构部分的实现逻辑是一样的
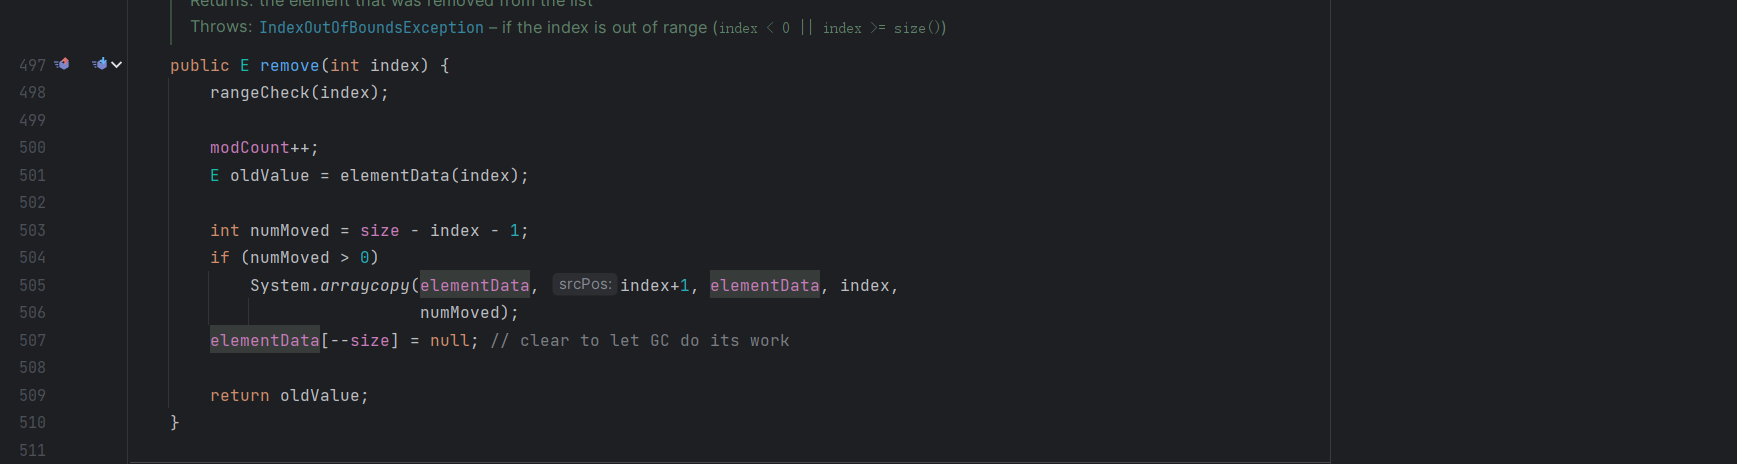
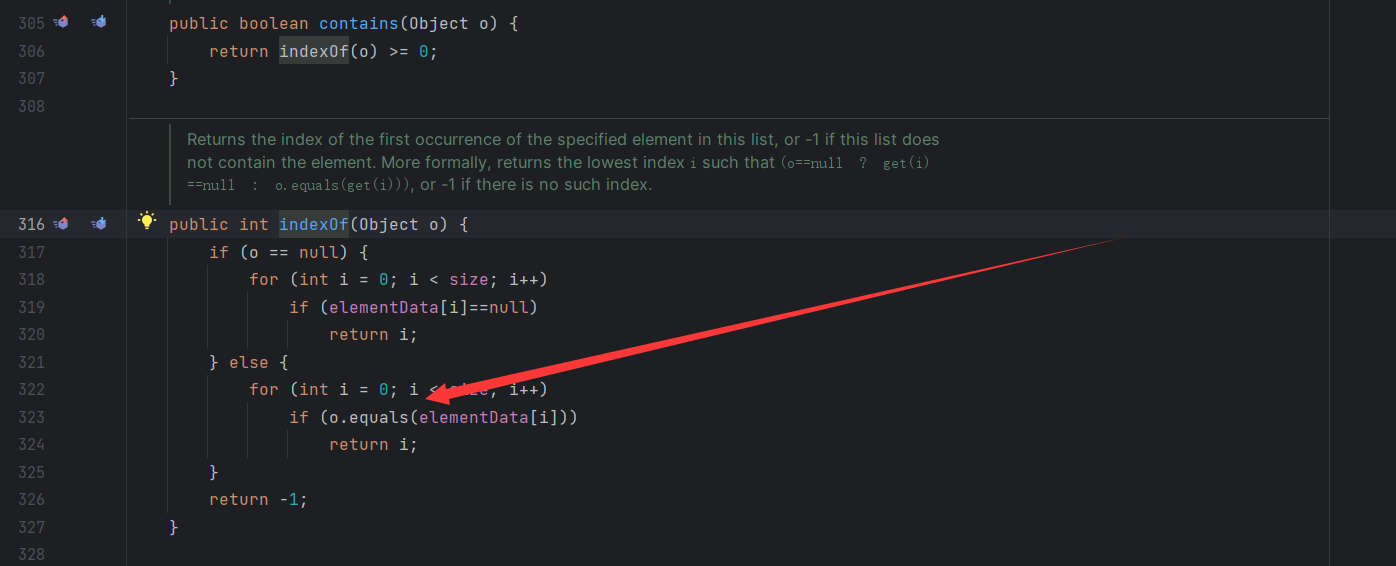
接着看一下 remove 方法,先检查范围

然后通过 elementData 获取元素,然后使用 arraycopy 将元素进行一个复制,这个方法效率更高,但是逻辑还是一样的
# Linklist
实现原理不太一样,但是功能其实和 ArrayList 是一样的
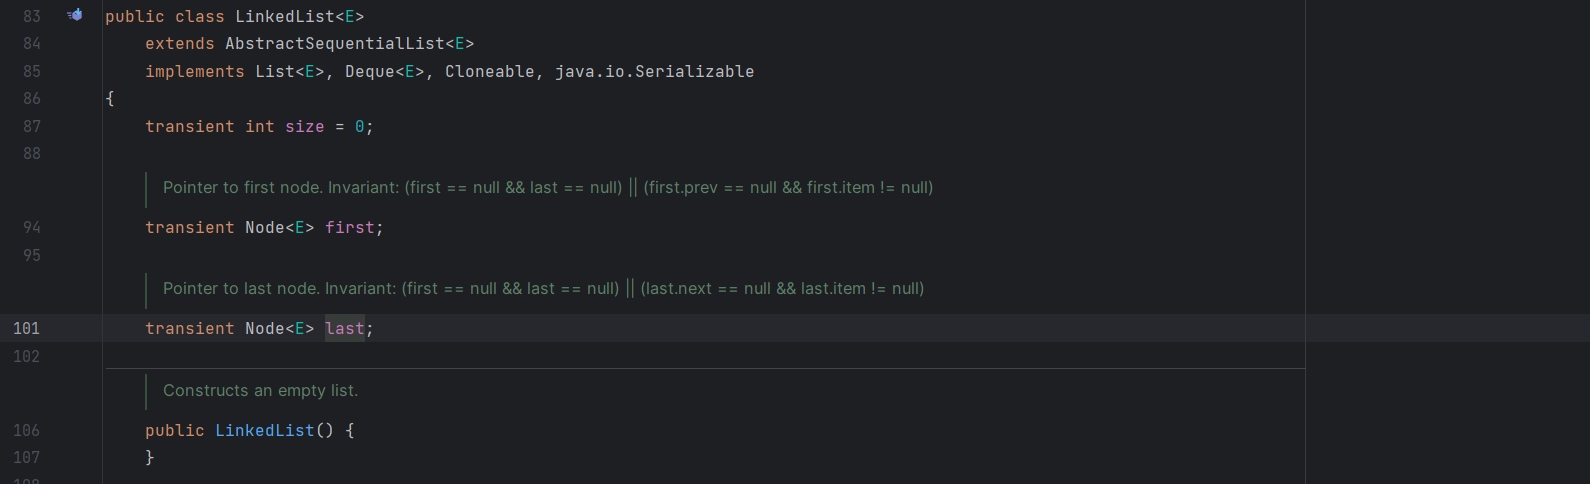
这里它只有三个成员变量,大小,第一个结点,最后一个结点

它存放数据是这样的一个结点,使用的是一个双向链表
他的 add 方法

这里直接调用了 linkLast
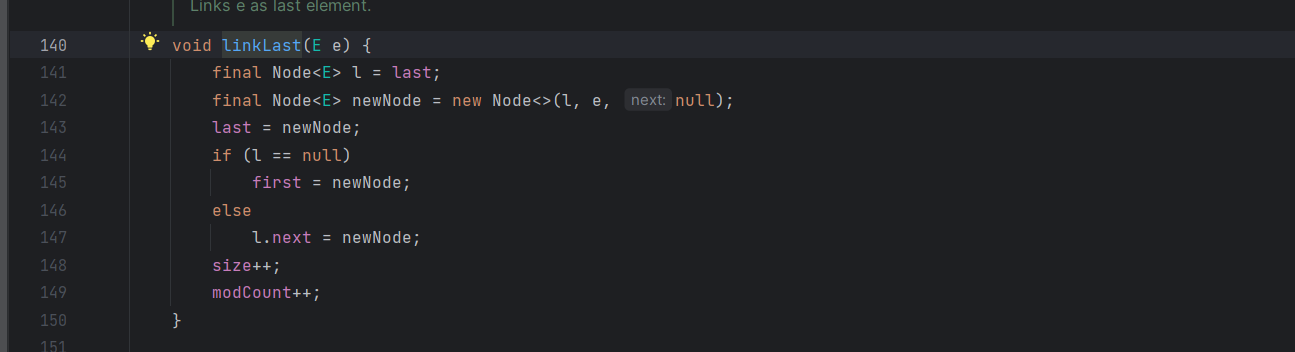
逻辑还是一样的,不过这里是双向链表,还是有点区别的
# Set 集合
set 集合是一种保证没有重复元素的集合
这点可以从 add 方法中体现出来,其他的方法都是 Collection 接口中继承过来的,这里还是具体看一下实现类
# HashSet
这里实际上是一个 HashMap 在实现
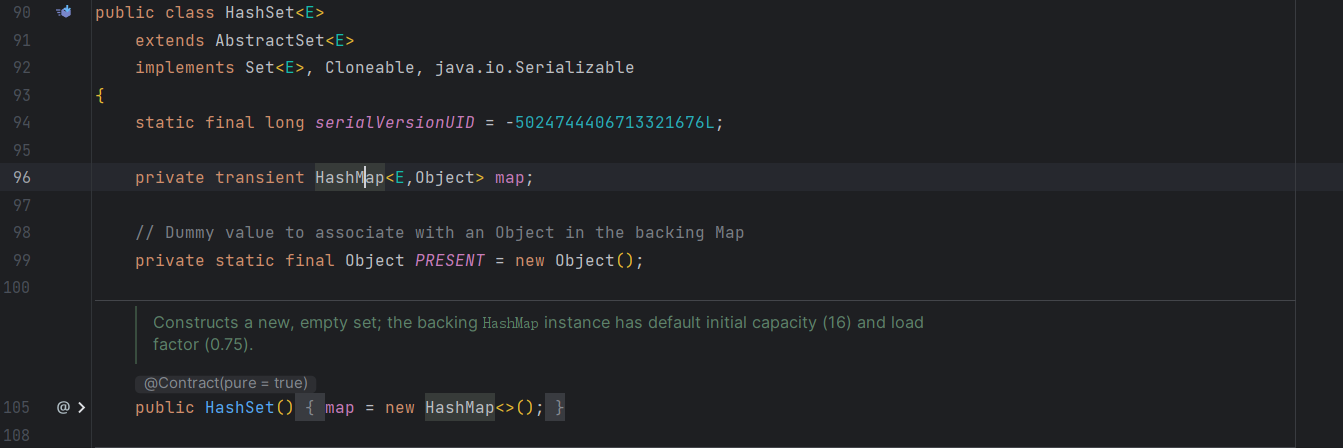
这里会在后面 map 的记录中再详细的看一下,先看看常用的一些方法
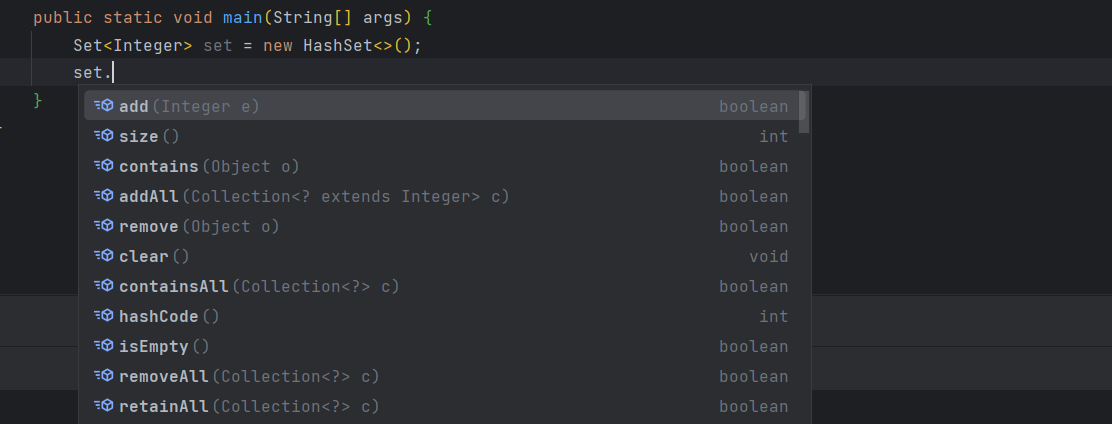
这里可以看到有的方法很多,这里先尝尝添加两个相同的元素
public static void main(String[] args) { | |
Set<Integer> set = new HashSet<>(); | |
System.out.println(set.add(10)); | |
System.out.println(set.add(10)); | |
System.out.println(set); | |
} |

这里可以看到,第二次添加实际上是失败了的
# Map 映射
映射简单来说,就是两个元素之间的对应关系,而在 Map 中这种关系被存储为键值对

它有着这样一个限定,这实际上很 “映射”

Map 和之前不同的是,他并没有继承 Collection 接口,这里举例一个最简单的使用
public static void main(String[] args) { | |
Map<Integer,String> map = new HashMap<>(); | |
map.put(1,"test1"); | |
map.put(2,"test2"); | |
System.out.println(map.get(2)); | |
} |

其他使用的方法很多,但是很简单,这里不在一一列举
在 HashMap 中存放数据的地方实际上

这里其实很简单的逻辑,存放 hash,key,value,指向 next

存放 hash 表的地方,这里就是一个最核心的地方,接着简单的看一下 put 方法
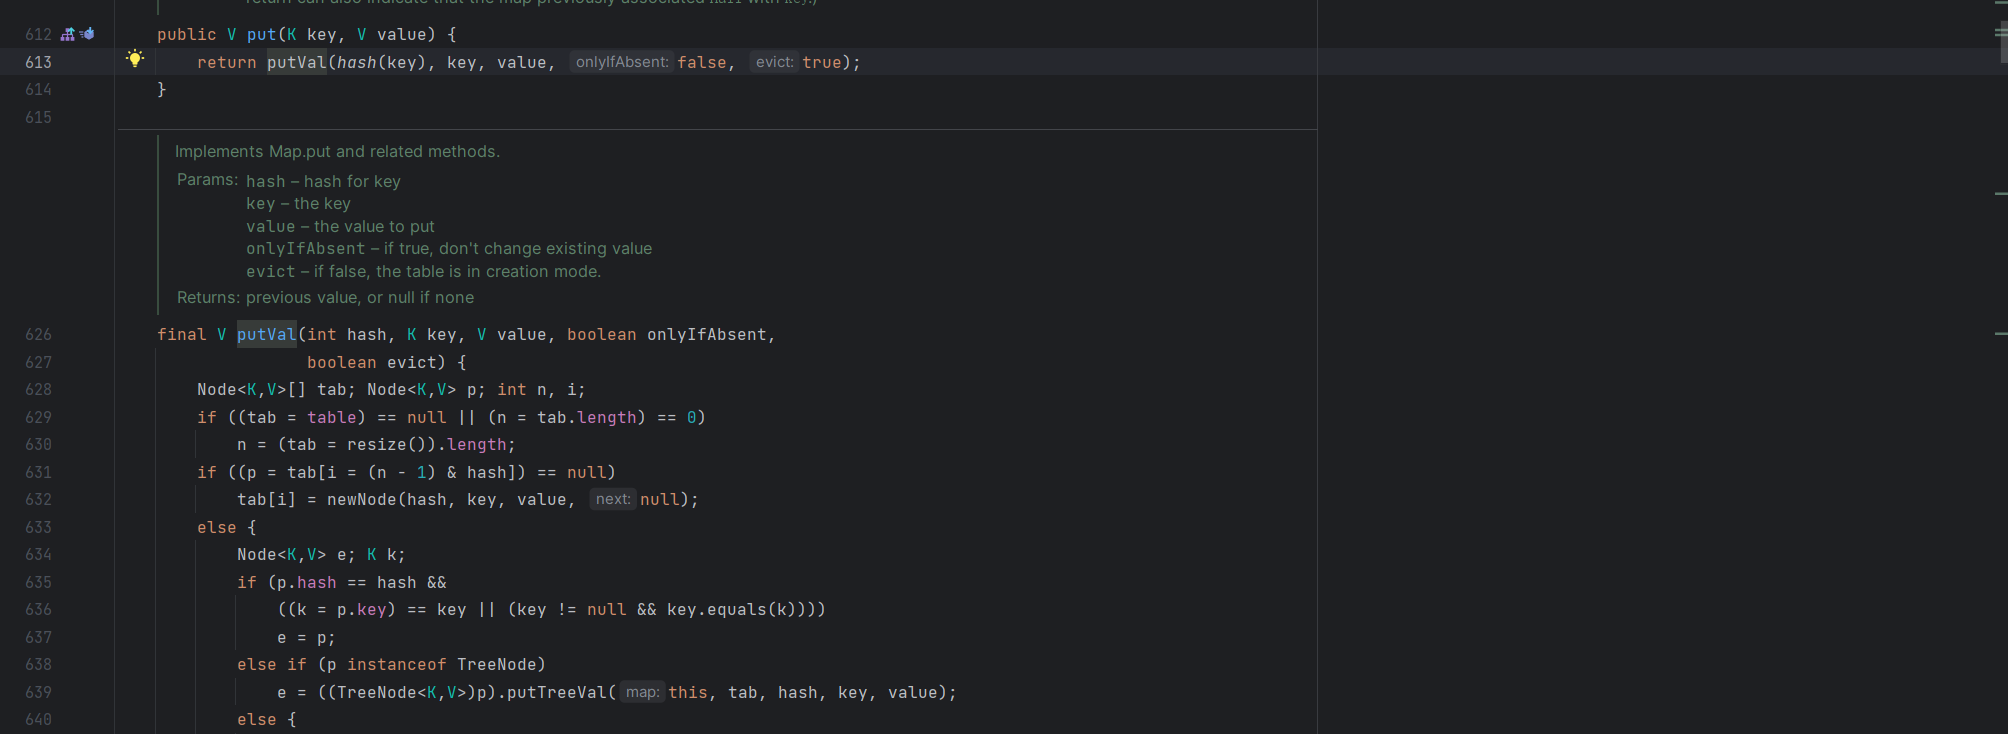
这里可以看到 put 方法将 key 值 hash 后一并传入 putVal 方法,这个代码块比较长,这里我加了一下注释可以看一下
final V putVal(int hash, K key, V value, boolean onlyIfAbsent, boolean evict) { | |
Node<K, V>[] tab; // 哈希表数组 | |
Node<K, V> p; // 表示要插入的位置处的节点 | |
int n, i; // 数组长度 n,计算插入位置的索引 i | |
// 如果哈希表数组为空或长度为 0,则初始化 | |
if ((tab = table) == null || (n = tab.length) == 0) | |
n = (tab = resize()).length; | |
// 根据 hash 值计算插入位置的索引 | |
if ((p = tab[i = (n - 1) & hash]) == null) | |
tab[i] = newNode(hash, key, value, null); // 如果该位置为空,直接插入新节点 | |
else { | |
Node<K, V> e; // 用于遍历链表或树的节点 | |
K k; // 临时保存节点的键 | |
// 判断第一个节点是否与要插入的键相同 | |
if (p.hash == hash && ((k = p.key) == key || (key != null && key.equals(k)))) | |
e = p; // 如果相同,将 p 节点作为要插入的位置 | |
else if (p instanceof TreeNode) | |
e = ((TreeNode<K, V>) p).putTreeVal(this, tab, hash, key, value); // 如果是树节点,调用树节点的插入方法 | |
else { | |
// 遍历链表,查找是否已经存在相同的键 | |
for (int binCount = 0; ; ++binCount) { | |
if ((e = p.next) == null) { | |
// 如果遍历到链表末尾仍未找到相同键,则在链表末尾插入新节点 | |
p.next = newNode(hash, key, value, null); | |
if (binCount >= TREEIFY_THRESHOLD - 1) //-1 为了保持链表结构 | |
treeifyBin(tab, hash); // 判断是否需要将链表转换为树 | |
break; | |
} | |
// 判断链表中是否存在相同的键 | |
if (e.hash == hash && ((k = e.key) == key || (key != null && key.equals(k)))) | |
break; | |
p = e; // 继续遍历链表 | |
} | |
} | |
if (e != null) { // 存在相同的键,更新值 | |
V oldValue = e.value; | |
if (!onlyIfAbsent || oldValue == null) | |
e.value = value; | |
afterNodeAccess(e); // 节点访问后的处理,用于 LinkedHashMap 等特殊处理 | |
return oldValue; // 返回旧的值 | |
} | |
} | |
++modCount; // 哈希表修改次数加 1 | |
if (++size > threshold) | |
resize(); // 判断是否需要调整哈希表大小 | |
afterNodeInsertion(evict); // 节点插入后的处理,用于 LinkedHashMap 等特殊处理 | |
return null; // 返回 null 表示插入的键之前不存在于哈希表中 | |
} |